Sunday, 26 January 2014

Bibs, Frumping, Ghosts, Cereal and Frankenstein - The Overdue Return!


Well, well, well. It has been a very long time since I last wrote, and to be honest, the longer it has been, the more pressure and anxiousness I have felt to write again – yet, here I am, laptop resting on my knee, emergency chocolate supply by my side (very important) and little threads clinging desperately on my clothes as evidence of a weekend spent in the company of my sewing machine.

I feel it important to begin with a very brief explanation, the headlines if you will, of why I have been absent from the blogosphere for so long. So: I left my job, moved to London and have started on the most incredible journey in an entry level fashion role – yes, that’s right, I spend long days surrounded by beautiful dresses, stunning fabrics, fancy sewing machines, gorgeous trims and unbelievably talented people! Everyday provides copious amounts of inspiration and encouragement for my own sewing experiments (and the occasional new fabric scraps and sewing patterns - winning).

Oh, and one other thing has changed for me – I also now have a fringe: Hi!


Now, brief catch ups out of the way, I thought I would ease back into things by sharing with you some of the garments I have made recently, after all, if you're reading a sewing blog, you're probably a little more interested in the sewing itself than my career path and hair choices!
 
SIMPLE SQUARE TOP
 
This was probably one of the quickest and simplest things that I have made - and who doesn't just love a quick and easy sewing project every now and then?!
 
 
I'm not exaggerating, this top was literally made of two squares sewn together, leaving gaps for armholes and cutting a hole for the head (not essential, but please be aware that without this step, you would look like you were wearing a child's fancy dress ghost costume) then finishing the edges with a little hemming and bias binding! I added a little decorative button placket on the back, but this is purely because of my mild to moderately extreme obsession with buttons.


Don't get me wrong, it's far from a perfect make, but I'm really loving casual, easy to wear styles, and this top can be thrown on with a pair of  ripped jeans (as demonstrated) or some smarter chinos or tucked into a pencil skirt - a staple shape that I plan to make again!
 
 
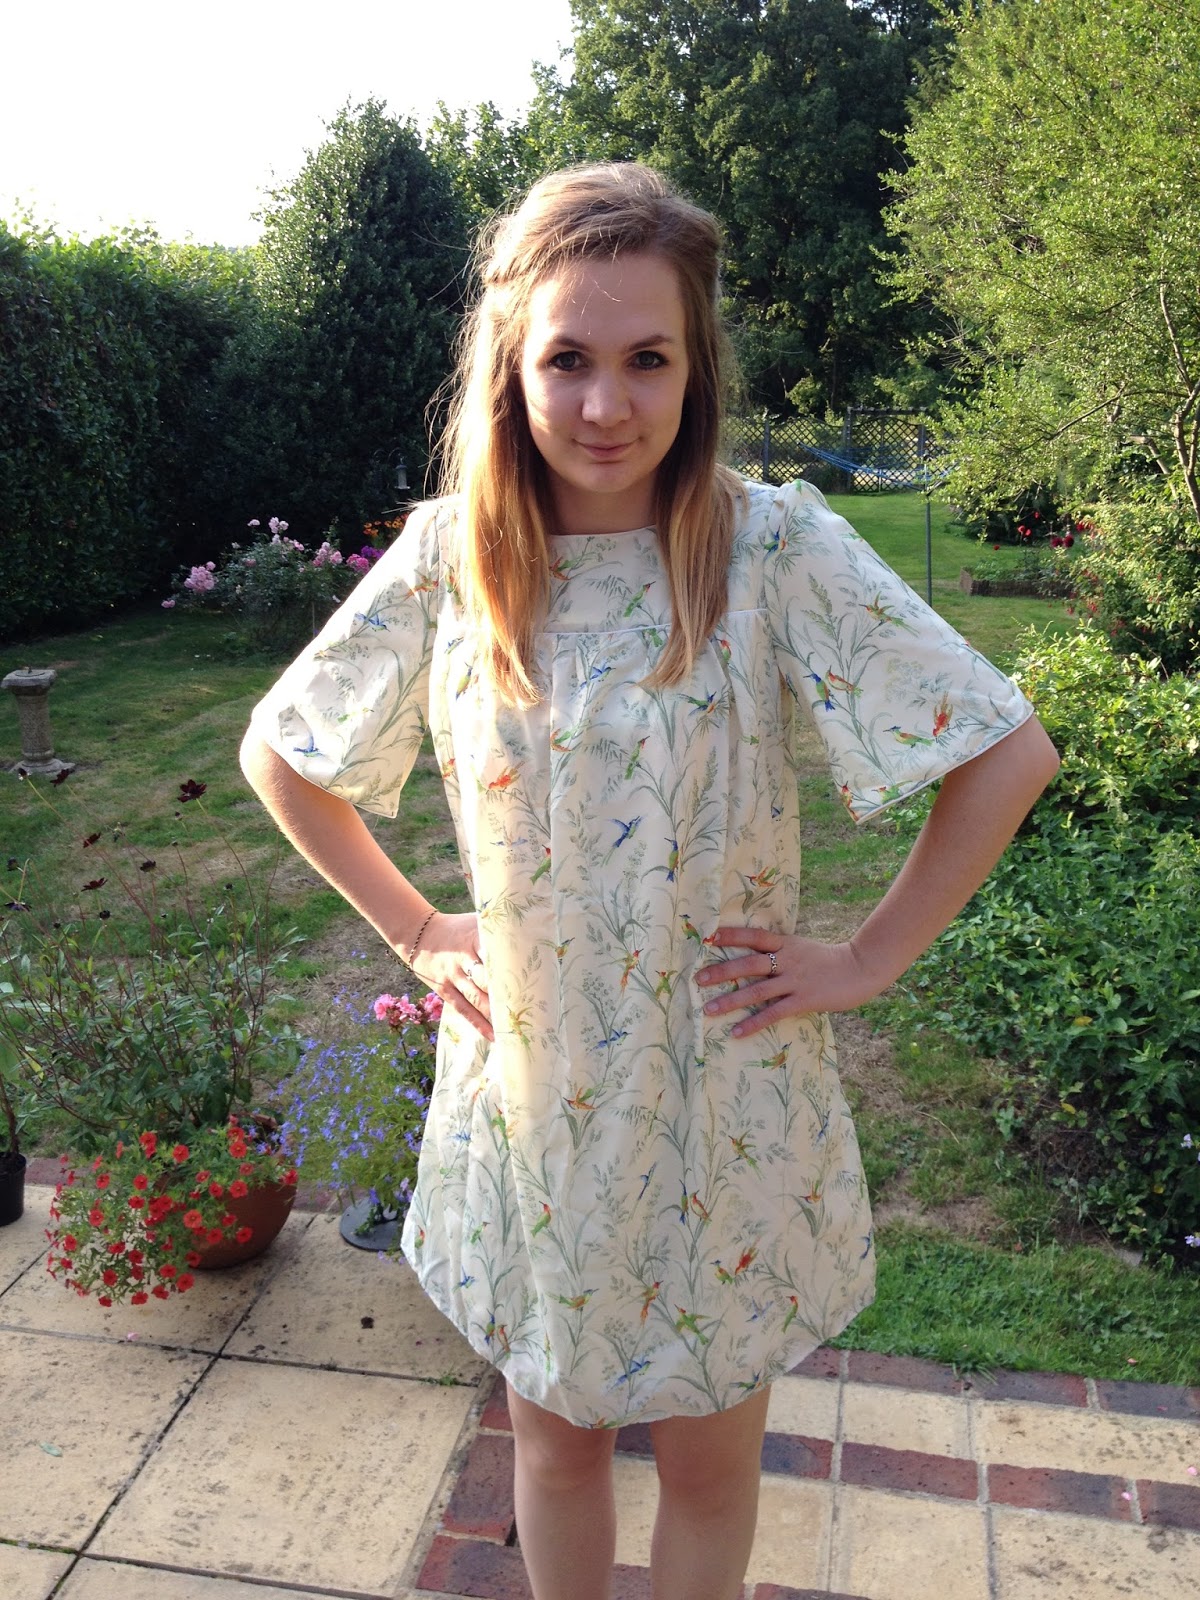
CONTRAST YOKE ELASTICATED DRESS
 
The thing I love most about this dress is the fabric (from work) - I love all the shades that work together to create an ombre effect and really summery style (I'm thinking ahead a few months!)


(Please note the left sock which has made it's debut in front of the camera)

 
I think I might have actually told a lie, the thing I like most about this dress, is finally finding a use for the bluey/purple lace that I have had stowed away in my fabric box for months - I initially planned to make my own version of a dress warn by Scarlett Johansson, but then I remembered, I am not Scarlett Johansson, so the dream was short lived...but alas, it has found an even greater purpose, working alongside this beautiful cloth.
 
 
This was yet another simple creation, which could be simplified further by excluding the zip, but I thought that it added another fun element to this cheerful dress.
 
AUTUMNAL BUTTON DOWN BLOUSE
 
When I went on my first trip to Goldhawk Road last summer, I acquired this beautiful autumnal fabric, which caught my eye because of the sweet mustard yellow flowers.
 
 
Inspired by some of the beautiful equipment style ditsy print blouses I have seen on the high street lately, I thought that this print would look good in a similar style shirt - so that's what I did!
 
 
I adapted a shirt pattern that I really liked sewing from before, creating a V-neck and 3/4 length sleeves to create a more casual look to suit the print, and added some cute wooden buttons, et voila! 
 
 
I admit, this blouse treads a fine line between vintage/quirky chic and frumpy old lady, but either way, I have in the past been referred to as being 'old before my time', so I figure it's a win - win situation!
 
PRETTY, PRACTICAL AND PLAYFUL - THE PINAFORE
 
Something else that has caught my eye since being in London, is an abundance of pretty pinnies. I think they look so smart and different dressed up with a shirt for work, or dressed down and worn over a loose t shirt for a more casual look. When I got to thinking about it, I realised that the concept was really just a skirt with a bib and long straps - so I thought I'd take a stab at making my own!


I'm not 100% satisfied with this make,  and I'm not embarrassed to share things that haven't worked perfectly with you, because to only show things that have worked as intended, would not only be a dishonest fabrication of my sewing journey, but would also leave me with a pretty empty sewing blog! This aside though, as a concept and starting point, I'm really glad I gave this a go! Plus, I made my own pattern from scratch, which is always fun to experiment with. I will definitely be attempting this again to iron out the glitches, as I think it could become a wardrobe staple.


I like the detail of crossing the straps over at the back to add some interest to the garment - if nothing else, it was an excuse to use some more of my beloved buttons!
 
PLEATED 'SPECIAL K' SKIRT
 
Ok, so this skirt has nothing at all to do with breakfast cereal, but unfortunately for me, due to some clever marketing and TV advertising, feminine red clothing will now always make me think of branded morning meals!
 
 
Before starting in my new job, I never gave much thought to pleating and how it worked, and had several unsuccessful attempts at pinning, pressing and tacking length after length of fabric to try and create this beautiful effect. I now know though, that you can get professional machines to do this for you! Luckily for me, I didn't have to splash out on this, as this perfectly sized length was being thrown out at work - result! Cue the pleated midi!


JUMPSUIT REFASHION
 
This year, I am aiming to embrace the world of refashioning. Believe it or not, I find it so much easier to start with a flat length of fabric and creating a new skirt or top from scratch, than taking an old blouse or unloved dress and transforming them into something new. On this occasion though, a Frankenstein-esque refashion was the first thing that came to mind to make a fun, quirky jumpsuit.
 
 
What did this jumpsuit start its life as? I hear you ask. Well, I'm even hesitating over my keyboard right now, wondering whether to reveal it...Oh well, what is there to lose? I did mention earlier about being honest. This jumpsuit was once a pair of pyjamas. Yes. Pyjamas.
 
I completely fell in love with the print when I stumbled across it in a 'final clearance' sale that I went to when trying desperately not to spend my Christmas money, here is a close up of the print, as I don't think the above photo does it justice.
 
 
I tried the PJs on in the fitting room of the shop, tucking the cami into the waistband of the trousers, asking myself 'am I really considering doing this?' and, as you may have guessed, the answer was obviously yes! After all, what is a jumpsuit anyway, if not a onsie that is socially acceptable to wear in public?!
 
Besides, if anyone says anything, I can claim it's some new London fashion trend...and if that doesn't work I can run home to bed and hide - at least I'd already be dressed for it!

 
That's all for now - I do have some other new creations to share with you next time - now I'm back on the blogging planet, I plan to stick around - It's good to be back!
 
 
Em x


Sunday, 18 August 2013

The Itty Bitty Baby Dress

I don’t know about anyone else, but whenever I go shopping, there is one thing that can, without fail, make me smile and go all mushy inside, exclaiming “aww” and cooing at all those around me - and that, is baby clothes!
Now, I don’t have any babies of my own, and since the beginning of my sewing adventure, no one I know has had babies either – until now! My boyfriend’s sister has had a beautiful baby girl, and I finally feel confident enough in my sewing to tackle a new teeny, tiny (literally) project for someone else. Cue the Itty Bitty Baby Dress from Made by Rae!
 
 
This pattern is just adorable, and do you know what else? It’s free – yes, FREE! It comes in two size variations, one for a small newborn weighing 7-8lbs and a slightly bigger (though still miniature) 9-11lbs. I went for the slightly bigger size, as although she is only a very small baby; I don’t want her to grow out of it too quickly.
 
 
Even in the larger size, I was stunned at how little fabric was needed – I had leftover from ½ a yard of the main fabric, and the lining was leftover fabric I had from my Miette skirt. Throughout making the project, I kept pausing to swoon over how cute (and quite frankly, mind bogglingly tiny) it was. I also love the quirky, cutesy Paris fabric, I bought this on ebay months ago, and although I have always longed to include it in a project, none have seemed quite right, until now!  
When it came to finishing seams, I chose to use French seams (great tutorial here) so that they would be soft against her newborn skin, I didn’t want the dress to be at all rough or uncomfortable for her.


Assembling the dress was really logical, though Rae’s notes were handy to read through as this was my first baby garment. The pattern itself is so beautifully simple, that there is so much scope to customise it in lots of different ways. I chose to create the pattern as it was intended, as it is just so lovely, though I must say, I have lots of ideas for further incarnations!
 
This project was an opportunity for a couple more 'firsts':
 

Just to give some perspective on how tiny this is, here it is hanging up next to one of my dresses!


- People in my life; have more babies please!
 

I Made Labels!

I made my own labels - for 7p each!!
 
 
I once tried to make a label from a piece of ribbon and some very dodgy hand stitching (it looked like when you used to write HELLO on your calculator) so abandoned labels for a while after that. Lately though, I’ve wanted to add a professional finish to my homemade items, and I think adding a label can help do that. There are lots of tutorials online and numerous different techniques have been suggested, but I thought I would share with you how I made mine too, ‘cause you can never have too many options!
You will need:
  • Your design
  • Computer
  • Fabric Paper
  • Basic sewing equipment
  • Very little computer knowledge!
I started off with some doodles before finalising my idea, however after 40 different attempts at drawing a decent cotton reel and writing my name until it lost all meaning (this happened after doodle 27, if you’re interested) I scrapped this idea entirely and instead, decided to link the label design to my blog (“consistent branding” if you will). On the computer, I copied the background image at the top of my blog, and simply typed ‘Threads From Em’ in grey. I did this on Paint – (I know some people may gasp in horror at this, but I’m not the most techy person in the world, and paint has always been a friend of mine!)
 
 
When I was sure I was happy with the look of the design, I saved the image and moved across to Word (gasp) and pasted the image into a table. I could only fit two columns of my label on to one sheet, because I was mindful of leaving a large enough border on all sides for finishing the raw edges, but if you’re design is smaller, you can easily fit loads more on!
 
Load the printer with your fabric paper - which is really great stuff! It is basically cotton fabric, backed onto paper which you peel off when your design is printed, I got mine here, set the print settings correctly as per the manufacturers instructions - I recommend a test run on bog standard A4 before printing on the paper, you want to make sure you’re happy with how it looks and the size etc., then print away!
 
 
Then cut around each one:
 
 
There are two ways I have finished the labels, one by zigzagging around the edge for a fun finish on a child’s garment, and the other by pressing and stitching a neat border around the edge.


Also, when I finally get round to making the Great British Sewing Bee PJ bottoms for my boyfriend, I have some more boy-friendly coloured labels too!
 
 
Oh and did I mention, mine worked out as a mere 7p per label?! (actually, o.o662p, but whose counting?!)

Wednesday, 7 August 2013

Mathilde, Mathilde, Mathilde, Mathilde

If you have stopped by my blog before, you will know that I am an unreserved fan of the Mathilde Blouse, created by Tilly over at Tilly and the Buttons. This is not just a fleeting statement, but as you're about to see, this pattern has been a big influence on my recent makes. I have now made it (in some form or other) four (yes, four) times! I never intended to create so many variations from the same pattern, it just sort of happened. Hopefully, this post will show how, with a few simple alterations, you can use one (brilliant) pattern in so many ways!


Mathilde 1:


This was my first encounter with the Mathilde Blouse pattern, and as soon as I saw it, I knew I had to have a go at creating it. The big sleeves, the pintucks, the beautiful button back, yep, sold! I bought the pattern with excitement and anticipation, as I knew creating it would involve some new skills and techniques that would take me out of my comfort zone. As for the fabric, I stumbled across it during one of my many online fabric searches and just couldn't get it out of my head - you could say it stole my heart (sorry). There was only 1 metre left of this material, not enough to make the full blouse, so I had to make some adaptations - I turned it into a cropped, short sleeved version. A couple of months after I made this blouse, Tilly provided instructions on how to make a summery version of the classic original, which featured short sleeves, so I guess I had already sort of made one of these the other way round! (a complete coincidence, but I like to think this makes me a sewing psychic).

The first time I:
  • Bought and assembled a PDF pattern - I'm now a big fan of the immediacy of downloading a pattern, plus, I became reacquainted with my Pritt Stick!
  • Made buttonholes! This was something I had avoided for a long time, and even after turning every piece of scrap fabric I owned into a buttonhole shrine through practicing, these are far from perfect - I have to make sure that I wear something underneath at all times, because I made the buttonholes too big for the buttons (which I love - thank you Cath Kidston!) All this aside though, I'm still really proud of this blouse and wear it regularly.


Mathilde 2:


The pattern as it was intended! I made the classic blouse for my mum for her birthday earlier this year. She had, for a while, been admiring my summery Mathilde, so with her birthday around the corner, I decided to make her a blouse of her own! The fabric was a dream to work with - where I wanted a pintuck, the pintuck there was! Gathered cuffs? No problem, the fabric bunched beautifully. This might have been one of my most straightforward makes to date.

The first time I:
  • Made a garment for someone else! That may make me sound like a selfish stitcher, but really it is just so much easier to measure  and make things for yourself - plus, I can forgive a couple of mistakes, (remember on school reports when you got awarded for effort?!) I set myself the task of ensuring this was my best make to date as my mum really deserved it - and you know what? When I made it, I really think it was! 


Mathilde 3:


For a long, long time, I have wanted to make a loose fitting, flattering dress, that didn't leave me looking like I was playing dress-up in one of my dad's work shirts. This certainly seemed to be an impossible task for a significant period of time; but then, when I was abandoning hope, there was the Mathilde - what if it became a dress? Within days of entertaining this idea, I was scrolling through the Mathilde Makers Gallery and I came across Katy's dress version - it could be done (eee!) and done, it was! I love the colour and drape of this dress, before parting with any money for it, I assembled mood-boards of orange and coral dresses, just to be sure I was truly committed so something so bold (I was).

The first time I:
  • Strayed away from good old safe cotton! If cotton is the Prefect of fabric school, then the fabric I chose was definitely the rebel of the class, most likely to be found in detention or bunking off lessons. I won't lie, I am not a fabric expert (this is something I absolutely have to work on) and can't for the life of me remember what material this is, but I had never worked with a slippery, slidey fabric before. There were definitely some hiccups along the way (the pattern doing a sterling impression of Bambi on ice against the fabric) wonky pleats (which I reworked until they were worthy of the pattern) and uneven hemlines (I inadvertently made a high-low hem- I went with it, and am really pleased I did!)


Mathilde 4:


I'm pretty sure that calling this a Mathilde at all is somewhat inaccurate, however the pattern I made originated from the Mathilde base - so I'm sticking to it! I removed the button back, chopped the sleeves into wide, shorter ones, instead of pintucks, gathered the front of the dress into the bodice, and finished the sleeves, neckline and bodice seam with bias piping. I was able to have a lot of fun with this make, as I had nothing to compare it to - hacking the pattern meant I wasn't comparing my own creation to those made by more experienced sewists.

The first time I:
  • Completely hacked a pattern (sorry Tilly!!)
  • Piped seams (as mentioned in my previous blog, I am now in love with this technique!)
  • Stitched a rolled hem (sort of - I found a fab tutorial on how to create one without a rolled hemming foot)
  • Lined a garment when there were no instructions to do so.


This completes my Mathilde collection...for now...I don't yet have an original version of the blouse for myself - so much potential!