Sunday, 15 February 2015

JUMP(er) for my Love

I love jumpers. I mean, I really bloomin’ love them. I would say that a good 97.8% - scientifically calculated of course – of this love stems from the fact that I spend a similar proportion of my time cold. It is not unusual for my colleagues to greet me with a cheery ‘hello’ closely followed by a ‘how many layers today?’ (To which my answer, more often than not, is: ‘two pairs of leggings, two pairs of tights, two pairs of socks and 4 tops. It’s true; my legs are actually half the size they appear). Now, I don’t want you thinking I’m some form of lizard, this irrational igloo I seem to live in is usually limited to the winter, but when the cold perseveres for as long as it is seeming to at the moment, it feels like summer sunshine lives in a mythical land with unicorns and where you don’t have to work for a living.
Anyway, enough about my irregular body temperature, let’s talk clothes!
A fashion trend I am really loving at the moment is something I like to call ‘rebellious school uniform chic’ which is basically, a long untucked shirt or top, under a big slouchy jumper. Here are a few images to better illustrate what I mean:


all pictures taken from Pintrest searching 'layered sweater outfit' I do not own any of these images.
 
Anyone who has read my blog before will also not be a stranger to my love of back detailing – hello four versions of Tilly’s button back blouse – I have always been a fan of the feature of a garment not being initially obvious, and I like the beauty of it being at the back – also, I love my back so always like to draw attention to it (just kidding!) So when I was having a daily scroll through Pintrest yesterday morning, it is not surprising that I fell in love with some jumpers and sweatshirts with unusual backs, like these gems:


all pictures taken from Pintrest searching 'open back sweater' I do not own any of these images.
 
I wasn’t able to shake the thought of making my own feature jumper last night, and then I remembered a jumper that was shoved to the back of my wardrobe that I had once borrowed from my sister after having an impromptu sleepover at her house following a glass or two of school-night vino. She was going to throw it away, but never one for giving up on an unloved garment, I offered to give it a new, re-fashioned home...if ever I thought of something to do with it...you know where this is going, don’t you?!
Now, this is where my frustration comes in, as I forgot to take any ‘before’ photos. So instead, I have found an image of something very similar to my ‘before’ garment – thank you Google. I was convinced that I would never wear this jumper in its former state, which definitely gave me more confidence to attack it with a pair of scissors.
image taken from Google. I do not own this image.
 
The process was so simple, I was done within two hours – and I am a slow seamstress, believe me. As I stupidly didn’t take photos, here are some appalling sketches I drew to illustrate the process (please don’t judge!)
 
One. Cut off the roll neck. Fold under the raw edge and top-stitch a new neckline.
 
Two. Fold the jumper in half lengthways to find the centre back, and then cut right the way up – make sure you only cut the back, so you are left with a sort of reverse cardigan.
 
 
Three. Overlap the back neck and stitch in place – now your cardigan should be more like a reverse cape.


Four.  At this point I tried my jumper on and marked how long I wanted it to be. This was necessary for me because mine started life as a jumper dress and I wanted it to be much shorter, you may find that yours is already the length you want in which case you can skip this step. I opted for slightly shorter at the front and longer at the back as it helped to emphasise the slouchy look I was going for.
 
 
Five.  Time to hem! I used a knitted jumper as opposed to a sweatshirt, so this step was really important  so as to ensure it did not unravel.
 
 
Six. Time for some detail! I had a beautiful off cut of silver and ivory jacquard that I thought would make a gorgeous bow feature. So I cut two long strips, folded them in half lengthways and stitched along one short edge and the long edge, then turned them right-way out and pressed into crisp strips, stitching the opening closed. Tip: a chopstick is a lifesaver to help turn out any fiddly tubes.
 
 
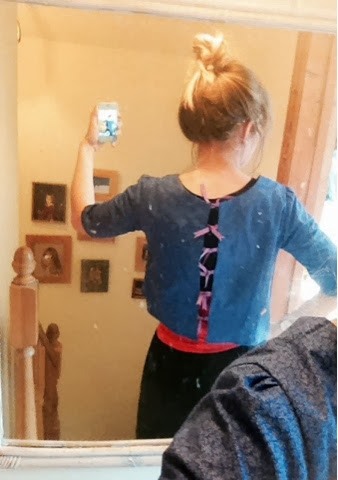
Seven. Stitch the ties you have just made to either side of the new back neck seam you have created and tie into a bow. I then decided to stitch the bow in place and finish it off with a big old complementary button, because hey, I love buttons!
 
 
Eight. Style and layer the jumper as you wish – I chose a white lace cami which also hangs below the hem at the front as it completed the look, but if you are feeling more daring, you could even go for a bare back –I clearly did not opt for this due to my earlier point of hating the cold!
 
 
And there you have it! A super simple ‘rebellious school uniform chic’ refashion, that took no time at all.


Does anyone have any old jumpers they would like to donate so I can continue my experimentation?!
Em x
 

Sunday, 18 January 2015

Lights...Camera...STITCH

Oh, hello again!
 
How have you been?
 
Good?
 
Great!
 
Me?


OK, in brief; I moved into my sisters place in London, took up an internship in a sample room for a company who design and make clothes (!!!) got a job out of it, moved into a flat with a good friend, learnt French to a level that Primary School children would be envious of (something I promised myself I would do, here) started Salsa (quit Salsa) went to two new countries, discovered a love for red wine and Jamie Dornan, took up yoga (and consequently realised just how inflexible I am) and spent time trying to learn a lot of things about...a lot of things. 
 
 
Enough of what I have been doing though, as aside from a couple of soft furnishing projects for my new flat, the pride of place my sewing books still have in my bookcase, and the fact that my bedroom looks like it is paying tribute to a haberdashery, I am a little embarrassed to say that I have not spent a lot of time with one of my greatest former companions, my sewing machine. I don't know if it is because I work amongst fabrics all day, finding loose threads in my hair when I come home, so I cannot face an evening hanging out with my pincushion, or if I have been intimidated by the talents of those around me and my realisation that I still have a lot to learn (all the more reason to keep on sewing really, I know) but whatever the reason, being the writer of a sewing blog when not a lot of sewing has been happening, doesn't lead to the most gripping material...


 but wait!
 
I am conscious that this post may so far be misinterpreted as my bowing out of the sewing world, but this, in fact, could not be further from the truth.
 
HURRAH! I hear you cheer! (well, I don't, but I am trying for optimism!)
 
 
This all changed just before Christmas, when I had a really exciting offer that had me rethreading my sewing machine and reaching for my pattern books!
 
 
Known for her quirky skirts, mismatched shoes and charmingly catchy lyrics, when the incredibly talented Jazz Mino (who also happens to be my flatmates sister) asked me to make her a skirt to add to her wonderfully eclectic wardrobe to be worn in her new music video, how could I refuse?!


Now, I'm not going to lie, I did hesitate a little before agreeing to help Jazz, because making clothes for myself is one thing - knowing how to conceal wonky hems, unevenly distributed buttonholes and untidy seams with accessories and by standing suitable distances away from people are handy tricks I have learnt when adorning my own makes, but making for someone else is another game entirely, this has to be...whats the word?...oh yeah, good! (gulp) but not only am I making for someone else (who, I might add, isn't my mum and therefore is obliged to love everything I make her, even when it was made out of macaroni and covered in glitter) I am making something that is going to be filmed, like, for people to see...(double gulp) I don't like to make things easy for myself do I? Maybe I should start wrapping this up and head back to my sewing machine before I scare myself out of the project!
 
Jazz reading 'Love at First Stitch' by the super Tilly during our planning session
 
The fun began on a chilly Saturday morning around my kitchen table, and as the peppermint tea flowed, so did the ideas, and before long, we had donned our coats, scarves and bobble hats and thanks to a handy google search aided by fellow bloggers on where is best to buy fabrics in the area, were on our way to East London to spend our pennies on fabric, netting, ribbon and pretty trims based upon the doodles we had sketched on a notepad.
 
I won't divulge too many details now, but am super excited to be able to share with you what we have been working on very soon - and this time, I really do mean soon! In the meantime, here is a sneak peak:


Em
x 

Sunday, 9 February 2014

My Home Sewn Week - Sunday

And just as quickly as it started, my home sewn week was over! (Forgive me for starting a sentence with the word 'and').

Before wrapping things up completely though, there is still one day and two homemade garments to write about - yes, two!

I'll start with the outfit I wore for the majority of the day; a super cosy jumper, mixing different fabrics of ponteroma and printed cotton:


The angle of the picture doesn't show it brilliantly, but the floral inserts on either side of the top are actually even! 


When I first made this top, I wasn't 100% sure how I felt about it, but having now worn it out for coffee with friends, I do really like it! It was very comfortable to wear, and even though the sleeves are only elbow length, the thick knitted fabric made if really warm. The construction process itself was pretty straight forward too, this was a bit of a freehand chop and stitch - I'm hoping that knitted fabric will never let me down and shatter my illusions of it forgiving a lot of mistakes! The one thing that did cause me trouble though, was something that really shouldn't have done; I stitched the right sleeve on upside down, cuff to shoulder. How I didn't notice this at the point of pinning is completely beyond me...I considered leaving it as it was, but quickly concluded that, however hard I try to convince people an uneven domed cuff is the new fashion, I don't think anyone would buy it.

The second garment I wore today was a real achievement for me, as I finally made something I have shied away from sewing since I started out on my sewing journey: a pair of trousers!! We'll, jeggings if we're going to get technical, but still, they are an item of clothing, worn on the bottom half of the body, that isn't a skirt!!


I hadn't actually been contemplating making trousers until I came across this heavy weight stretch cotton. I really fell in love with the modern monochrome photographic floral print, and couldn't see it in anything other than a pair of trousers. Does that happen to other people? The fabric absolutely dictated the garment, rather than the other way around.


The thing that had always put me off making trousers was the number of seams and not understanding the construction method, plus, finding a decent fitting pair of trousers is really difficult, so I didn't think that making them would be any different (which is a little ridiculous, considering that one of the reasons I started sewing was to have a wardrobe of clothes that fit perfectly!)

Luckily though, I had an old pair of work trousers, which were already dismantling themselves down several seams that were crying out to be my real life pattern. Another plus, is I knew that these trousers fitted well.


Once I had cut out 2 of every piece, it actually became really clear how to sew the pieces together and this was a really quick project! Obviously, I'm still working up to installing a fly and constructing a proper trouser waistband, so elastic was my friend here, a medium width piece, cut to fit comfortably around my waist was stitched into the waistband piece, and there you have it! A pair of jeggings!


I know that these trousers aren't perfect, but they are unique and turned out better than I thought they would, so I'm really glad that I finished my homesewn challenge with them!

Phew! 1 skirt, 4 tops, a dress, and a pair of trousers later and I'm done! I have really enjoyed documenting this week, but I'll be honest, I'm looking forward to getting dressed in the morning without having to think about what I'm going to write about my choice! That aside though, I think this last week has made me view my homemade garments in a new, positive way; I've learnt to see them as part of my wardrobe and how they can be incorporated into my day to day life, without feeling the immense pressure of wondering whether to wear something I've made and risk someone seeing a dodgy seam or loose button and realising it has been made by an amature seamstress in her bedroom!...

...And hey, If nothing else, I've discovered that I need to invest in some fabric in a colour other than blue!

Thanks for joining me on my journey this week, and I'll see you soon (but not tomorrow!)

Em x


Saturday, 8 February 2014

My Home Sewn Week - Saturday

Bonjour et bienvenue sur ma poste de la couture pour samedi!

Or

Hello and welcome to my Saturday post! 

(Thank you to my lovely housemate Henni for helping with the French)

So why have I gone all continental, you ask? Why, because of this book! It is beautiful, non?


That's right, it is a French sewing book, yes, French! 'Un ete couture' I find there something extremely romantic about a book, filled with pictures and instructions about how to make beautiful dresses, after all, what is it they say about Paris and fashion?!
 
The piece I chose to make first, was the oh so cute Top Liliane...


Those cropped sleeves, the bows down the back, the potential fabrics it could be made in. Swoon!


Now, some of you may have noticed at this point, that the book is, indeed, written in French, which I did find pretty daunting at first, but luckily for me and anyone else who is not able to read or speak French (one of my ambitions for this year is to change this!) there are super clear pictures illustrating how things should look, plus, the simplicity of the top is one of the things I love most!
 

Please excuse the creases in the top, it has been worn out today to my grandma's birthday lunch, and yes, I did have pudding.


I chose to make my blouse in a lavender coloured cotton that I have had for a few months, as I thought the sweet leaf detail really complimented the simplicity and elegance of this shape, and I love the French connection with lavender.


My absolute favourite thing about this top though, has to be the bows down the back, in the summer I may dare to wear it with nothing underneath (oo-la-la)but in British winter time, this simply isn't an option! I chose to use a purple ribbon for the bows, as I felt it added a fun pop of colour to the back.


See you tomorrow for the last post of my homesewn week, where I will look back and reflect on the last seven days outfits, and I don't just mean how much blue I wore (totally didn't pick up on that until now!)

Ps. Did anyone get the joke? 'Look back and reflect?' Like I am in the above photo?...
 
...Je suis très désolé...

Em x